Helm guide
Why Kubernetes YAML Files Make Me Cry
Deploying applications in Kubernetes is challenging. A simple application like wordpress would need atleast 6 different files comprising deployment.yaml, services.yaml, pv.yaml, pvc.yaml secret.yaml. Managing them throught the lifecycle of the application is confusing. Even if all definition are put into one file, the problems would be while chaging the configuration and the values.
Helm helps you manage Kubernetes applications — Helm Charts help you define, install, and upgrade even the most complex Kubernetes application.
Charts are easy to create, version, share, and publish — so start using Helm and stop the copy-and-paste.
~ helm.sh
Helm is like meme template, you create once, reuse and distribute several time.
Getting Started with Helm
Installing Helm
curl https://baltocdn.com/helm/signing.asc | gpg --dearmor | sudo tee /usr/share/keyrings/helm.gpg > /dev/null
sudo apt-get install apt-transport-https --yes
echo "deb [arch=$(dpkg --print-architecture) signed-by=/usr/share/keyrings/helm.gpg] https://baltocdn.com/helm/stable/debian/ all main" | sudo tee /etc/apt/sources.list.d/helm-stable-debian.list
sudo apt-get update
sudo apt-get install helm
Basic Helm commands
# check helm version installation
helm version
# Search for a helm chart on [artifact hub](https://artifacthub.io/)
helm search hub wordpress
# Add a helm repository
helm add repo brigade https://brigadecore.github.io/charts
# Search in an added helm repository
helm search repo brigade
# List added repos
helm repo list
# Update an added repo
helm repo update
# Install a helm chart
helm install my-wordpress bitnami/wordpress
# check status of chart installation
helm status my-wordpress
# Uninstall a chart
helm uninstall my-wordpress
Understanding helm charts
Customizing helm charts
By default the helm chart is installed in the .cache directory of root
.cache/helm/repository
The helm chart is downloaded in .tar format. All helm charts have the following structure.
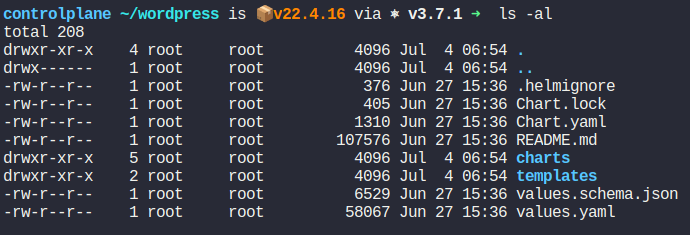
The README.md file as the name suggests include the instruction the author wants the user to follow. Thee are displayed on the hub as well.
Chart.yaml consists of metadata about the Helm chart, such as its name, version, and description.
Values.yaml contains the default values for the chart. These can be modified during installaion or upgradation
# Can then override any of these settings in a YAML formatted file, and then pass that file during installation
helm show values bitnami/wordpress
The chart directory has the following structure.
This directory is used to store dependent charts. If your chart depends on other charts, they are placed in this directory. It is also used for managing subcharts in a multi-chart setup.

The templates directory contains the Kubernetes manifest templates. Helm uses these templates to generate the final YAML files that are applied to the Kubernetes cluster. Templates can use Go templating to include dynamic values.

#### Some common files and their usage in templates/
- NOTES.txt: Provides usage notes and instructions after the chart is installed.
- _helpers.tpl: Contains helper template functions that can be used in other templates.
- deployment.yaml: Defines the deployment resource for the application.
- service.yaml: Defines the service resource for exposing the application.
- ingress.yaml: Defines the ingress resource for routing traffic to the service.
- configmap.yaml: Defines the configmap resource for managing configuration data.
- secret.yaml: Defines the secret resource for storing sensitive data.
- tests/test-connection.yaml: Defines test resources to verify the deployment.
- .helmignore: This file specifies files and directories that should be ignored when packaging the chart. It works similarly to .gitignore.
Customizing a helm chart during installation or upgrade.
In Helm, there are several ways to pass values during the installation or upgrade of a chart. These methods allow you to customize the deployment without modifying the chart’s templates directly. Here are the primary ways to pass values in Helm:
- Using the values.yaml File This is the default way to provide configuration values for a Helm chart. You can define default values in the values.yaml file within the chart.
replicaCount: 3
image:
  repository: myimage
  tag: latest
  pullPolicy: IfNotPresent
service:
  type: ClusterIP
  port: 80
- Using the –values or -f Flag You can specify additional values files using the –values or -f flag. This is useful for overriding default values with environment-specific configurations.
helm install myrelease mychart -f custom-values.yaml
replicaCount: 2
image:
  tag: stable
- Using the –set Flag For quick overrides, you can use the –set flag to pass values directly on the command line. This method is handy for small changes or for CI/CD pipelines. ```bash helm install myrelease mychart –set replicaCount=2 –set image.tag=stable
4. Using Environment Variables
You can pass environment variables into Helm values by using the --set flag with environment variables. This is particularly useful in CI/CD environments.

```bash
helm install myrelease mychart --set image.tag=$IMAGE_TAG
- Using a Combination of Methods
You can combine the –values and –set flags to provide a hierarchy of configurations, with the –set values taking precedence over –values.
helm install myrelease mychart -f values.yaml -f custom-values.yaml --set image.tag=stable - Using a YAML File from a URL Helm allows you to specify a values file from a URL, which is useful for dynamically fetching configuration files.
helm install myrelease mychart -f https://example.com/config/custom-values.yaml
The methods are listed from the highest to the lowest precedence:
- Command-line –set values
- Command-line –set-string values
- Command-line –set-file values
- Values files passed with -f or –values
- Chart’s default values.yaml
Helm chart lifecycle
The helm chart lifecycle can be denoted by these commands used.
#Create:
helm create
#Package:
helm package
#Upload:
helm repo index
#Install:
helm install
#Upgrade:
helm upgrade
#List:
helm list
#Rollback:
helm rollback
#Uninstall:
helm uninstall
Creating own helm charts
Create new chart
#First, use the Helm CLI to create a new chart. This command generates a boilerplate structure for your chart.
helm create mychart
This creates a directory called mychart with the following structure:
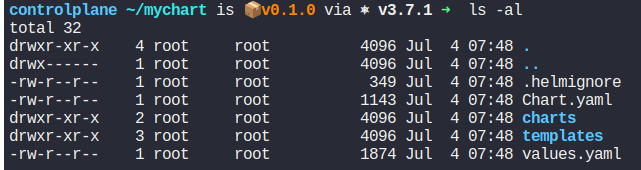 We will edit this boilerplate code.
Enter basic information about the chart in Chart.yaml
# There are some major differences between helm version 2 and 3
# apiVersion v2 indicate helm 3 charts. Missing apiVersion indicate helm 2 charts
apiVersion: v2
name: mychart
description: A Helm chart for Kubernetes
type: application
version: 0.1.0
appVersion: "1.16.0"
### Its a good practice to add maintainer section with email
maintainers:
    - email: [email protected]
      name:  john smith
Modify the template directory as per the application.
We will be removing all the files from this directory and be adding our own k8s resource files.
rm -rf templates/*
Add the deploiyment.yaml, service,yaml, value.yaml and any other yaml file required by the application. Make sure the values can be modified by changing them in vlaues.yaml using the Template directive syntax or Go Template language.
Installing the created helm chart
helm install mychart ./mychart
Conclusion
Kubernetes YAML files can quickly become overwhelming due to the complexity and volume of configurations required for even simple applications. Helm simplifies this process by providing a standardized way to package, configure, and manage Kubernetes applications. With Helm, you can create reusable charts, easily upgrade and roll back deployments, and manage complex configurations efficiently.
By following the steps and examples provided in this blog, you can get started with Helm, create your own Helm charts, and streamline your Kubernetes deployments. Helm not only saves time but also reduces errors and improves consistency across your deployments.
Always use helm lint to validate before deploying.